Introduction
For this assignment, the class headed out to the Priory. The Priory is a University owned area about 3.4 miles from the main campus. Figure 1 below shows the route from campus to the Priory.
 |
| Figure 1: Directions to the study area (Google Maps). |
The class met in the parking lot and discussed the activity. Each group was given five points within the woods behind the Priory. The groups were also given printed out maps, which were made by one of the group members that were made for
last weeks assignment. The groups also received a GPS and a compass. Dr. Hupy gave some instructions and set the class free. Each group was supposed to navigate to the five points they received. The navigation tools were limited and each person had a specific job to do while in the woods. The activity took less than two hours to complete.
Study Area
Figure 2 below shows the study area inside the dark blue square. The points were spread out within this area.
 |
| Figure 2: Study area of the Priory. |
Methods
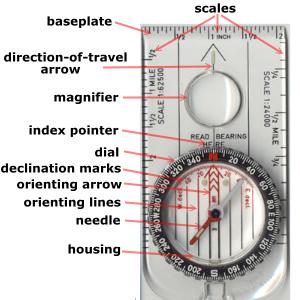
Before the groups dispersed, Dr. Hupy instructed the class on how to use the compass and paper map. He said to line the edge of the compass along the line being used to navigate. Then, adjust the dial so the arrow aligns with the orienting arrow. The person holding the compass was then supposed to hold it flat against their chest and follow it while keeping the needle in the orienting arrow. Figure 3 is the GPS the group used to verify the points and Figure 4 shows a compass similar to the one the class used.
 |
| Figure 3: The GPS used to verify the given coordinates. |
 |
| Figure 4: A similar compass to what the class used. |
Before heading out into the woods, the group found the five points on the map and marked them in order to navigate better. Figure 5 shows the five points marked for group 3. Figure 6 displays the five points coordinates that the group attempted to navigate to. The five points were really spread out which made the assignment a bit more difficult.
 |
| Figure 5: The five points marked for navigation. |
 |
| Figure 6: The five coordinates. |
Navigating with the compass took to time to get used to. The group figured out easily how to use the compass, but using it while hiking through the woods made things complicated. The terrain in the woods was rougher than expected and it was tough to walk in a straight line and keep the needle of the compass in the orienting arrow. The group had to stop many times within the woods in order to adjust the compass and ensure we were headed in the correct direction. Figure 7 and 8 shows group members Andrew and Heather using the compass to set up which direction the group should go. Like it was stated before, the terrain was difficult to navigate through. There were a lot of leaves on the ground, fallen trees, and many twigs that kept hitting all of us in the face. Figure 9, 10, and 11 display some of the terrain that the group came across.
 |
Figure 7: Andrew using the compass to figure
out how to navigate towards the first point. |
 |
Figure 8: Heather using the compass to navigate
towards one of the given points. |
 |
| Figure 9: The terrain the group encountered. |
 |
| Figure 10: Andrew and Heather dictating which direction to head next while in the woods. |
 |
| Figure 11: Andrew at the bottom of the ravine where one of the points was thought to be. |
Discussion
Throughout this process there were some errors and mistakes made. The first is shown in Figure 12. The maps the group used were my own and the legend said the contour intervals were 5 feet when it was actually supposed to say meters. This didn't produce any complications the field. The other mistakes made were thinking certain were our own when they weren't. The group came across many trees marked by pink tape (Figure 13, indicators of the points we were searching for) which were debated over whether they were ours or not. When looking at the maps it seemed as though the group was in the right area, however the GPS said otherwise.
 |
| Figure 12: Map mistake. |
 |
Figure 13: One of the markers the group
came across in the woods. |
Results
Below in Figure 14 shows the group's tracking points which were taken by the GPS. Figure 15 shows a line of these tracks along with direction. The tracks show the the group got close to the points, but sometimes not to the actual point. There was pink tape on some trees in that area that seemed like the right point, but the GPS points were off. The group got to the areas which seemed close enough. We couldn't decide if the GPS was off, we were off, or the tape had fallen off the trees and we couldn't find the right spot.
 |
| Figure 14: GPS tracking points in the woods. |
 |
| Figure 15: GPS tracking points with direction to the given points. |
Conclusion
This activity was very educational, frustrating, and fun. It is very useful to know all of these navigation skills, especially when technology fails. Navigation without technology is difficult, but possible with some practice.


No comments:
Post a Comment